
Home Assistant Notifications to Teams with Graph API
- Matt Zaske
- June 30, 2025
- 10 minutes
I love Home Assistant, and I love APIs/Webhooks/automations, so today we combine the two!
Some time back I wrote about using a webhook and Powershell to directly post a Teams notification. A few weeks ago, while working on some other Home Assistant business I wondered if it would be possible to do something directly from Home Assistant (HA). I've been using Slack notifications out of HA for years, but there's no officially supported similar Teams mechanism.
That sounds like a fun little challenge!
DISCLAIMER: This is all built out in my local network/lab environment. Thanks to Tailscale it's safely encapsulated and within my control. The code and bits below should not be used in a production system or one that is exposed to the Internet without adding several bits to protect yourself (additional firewalling, better input sanitization, etc.)!
Webhook or Graph API?
I used a Teams webhook in the past for the Task Sequence notifications, but it was a bit of an adventure to set up with additional moving parts. Not wrong to use a webhook, but I like APIs and knowing there's Teams APIs exposed in Graph...let's go that route instead.
"Behind The Scenes" Setup
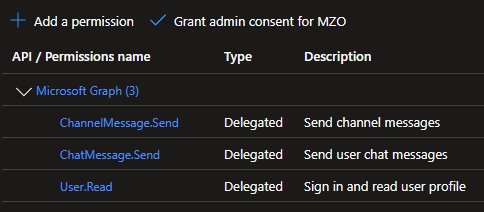
Because I'm using Graph API, I needed to set up the appropriate bits behind the scenes—specifically app registration for the project. Generally speaking, I followed my own instructions but instead of Application permissions I used Delegated permissions since Teams doesn't allow for Application permissions to post regular messages. Specifically, I used ChannelMessage.Send and ChatMessage.Send, though for this particular post we only need ChannelMessage.Send:
I also created a client secret for the project since that's necessary to handle the bearer token.
Challenge #1: Home Assistant REST Constraints
Home Assistant's in-built RESTful integration is great, but it comes with some limitations with how it can send and, more importantly, parse REST call responses. Without a proper integration written in Python, there isn't a trivial one-stop way to interact with Graph API directly from HA. For the sake of simplicity/proof of concept, that means I wrote a middleware/proxy I can have HA talk directly to, which will then pass and parse payloads between systems.
Enter The Proxy
Because PHP is my go-to language for random stuff like this, I decided to use it (and an Ubuntu host I have in my lab) as a proxy host for this little test. I also have a "test" Home Assistant instance in my lab so I don't completely screw up anything production (in my house).
On the proxy box, I create a vhost in Apache to host the "network-facing" parts, and set up a basic directory structure:
/parent/
-	ha-notify/
	-	conf/
	-	www/
		-	ha-auth/
		-	notify/
The conf/ directory is where my private stuff (tokens/environment info) is stored, and the www/ directory is where scripts that actually require interaction are housed (and the DocumentRoot of my Apache vhost).
Challenge #2: Delegated Authentication
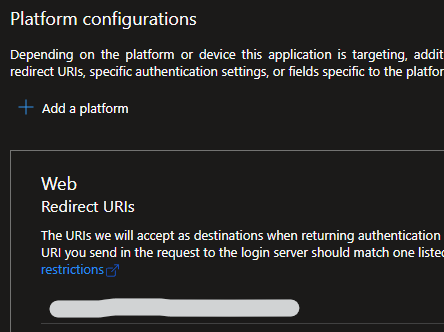
I usually make things that use Application permissions, so making something that requires Delegated permissions was a challenge. Essentially I had to make a callback/token management system on the proxy. This requires a redirect_uri to be specified, which you add in your project configuration under Manage → Authentication → Web Redirect URIs:
I am skipping over much about user-based tokens because in a real production system you would use a proper library or mechanism to manage this detail for you. The good news is that long-lived refresh tokens can be requested when you add offline_access to your scope in authentication calls. In a standalone configuration such as one would normally have in Home Assistant for an integration, as long as the integration is used periodically (thus invoking a token refresh in the code you use), the user-required portion of authentication would be infrequent (or one-time at integration setup). According to documentation, refresh tokens for this use case are expected to have a 90-day lifespan.
The Authentication Flow
The Microsoft documentation has additional illustrative information about the overall flow. Clarified/Explicit for this purpose, the authentication calls one needs to make to handle user authentication go as follows:
1. User is directed to authenticate
The same weekend I wrote this post, Merill Fernando created a neat tool to help create this initial flow! In this case, I have a "page" on the proxy that handles this invocation. User would be instructed to go to https://fqdn.lab/ha-auth/ which detects no active authentication and presents the user with this instruction and link:
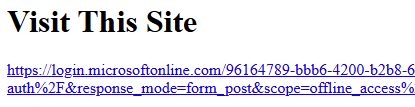
In production, you'd make this look far less suspicious, but we expected this basic information.
The user, clicking said link, is then taken through the normal authentication flow in their browser, complete with MFA. The user is then redirected to the redirect_uri we configured in the app registration and our invocation calls. In my case, this is a blank page (for the user) and not super helpful to the user (maybe a "thank you" would be good), but again for this test we expected this experience.
The calls used here require the TENANT_ID and CLIENT_ID for the application. I'm using HTTP POST for my response, so the URL the user visits looks like this:
https://login.microsoftonline.com/$TENANT_ID/oauth2/v2.0/authorize? \
client_id=$CLIENT_ID&response_type=code&redirect_uri=https%3A%2F%2Ffqdn.lab%2Fha-auth%2F \
&response_mode=form_post&scope=offline_access%20https%3A%2F%2Fgraph.microsoft.com%2F.default
Assuming successful authentication, the POST arguments returned at the redirect_uri will include a code (hereafter AUTH_CODE). My response script at redirect_uri looks for this value and safely tucks it away in the conf/ directory so we can use it for a proper token request when the time comes (next).
2. System makes a token request
Now that the user-based portion of the authentication is complete, we can mechanize the token part and do things automatically from here. We start with a token request:
https://login.microsoftonline.com/$TENANT_ID/oauth2/v2.0/tokenThe POST payload we send in this token request looks like:
grant_type=authorization_code&client_id=$CLIENT_ID&client_secret=$CLIENT_SECRET \
&scope=offline_access%20https%3A%2F%2Fgraph.microsoft.com%2F.default&code=$AUTH_CODE \
&redirect_uri=https%3A%2F%2Ffqdn.lab%2Fha-auth%2F
Note in the payload we include the aforementioned AUTH_CODE from the user auth and also include the CLIENT_SECRET we generated in the app registration. Since I requested offline_access the JSON response we get back from Graph will include our Bearer token (access_token) and a long-lived Refresh token (refresh_token). Tucking away the refresh_token in our conf/ directory means we can use this to request Bearer tokens down the road without requiring a user to manually re-authenticate (as long as something happens before that token expires).
There is additional information I'm deliberately skipping over here in how I'm managing tokens (bearer and refresh), but again that's because I wouldn't use this homegrown auth in a real/production environment...and neither should you. There are safer/better ways to do this at scale/in production.
Now We Can Do Things!
Since we've gotten through authentication, the proxy can make more traditional REST calls like we'd expect. For this example and clarity/simplicity, I am skipping how to determine the appropriate TEAM_ID and CHANNEL_ID values you need to handle the last mile of a Teams Graph call. There are a couple ways to obtain these, including requests to https://graph.microsoft.com/beta|v1.0/teams (documentation) and https://graph.microsoft.com/beta|v1.0/teams/TEAM_ID/channels (documentation) but your mileage and needs will vary.
The Notification Proxy Script
Because this is a work in progress/proof-of-concept, I'm truncating these snippets to their most important bits. This includes removing what I'm doing to sanitize inputs, validate tokens, and handle errors.
We'll start with the constants/inputs we receive. In this case, we have "constants" (team/channel IDs), our token, a randomly-generated GUID, and "arguments" received (via GET or POST from Home Assistant) for the title/subtitle/text. For clarity, the portion after the comments on the arguments is what we assume we're getting from our HA request:
$TEAM_ID= 'your_team_guid';
$CHANNEL_ID= 'extralongstring';
$TOKENDATA = <obtained from storage logic>
$ATTACHMENT_GUID = <randomly generated unique id>
$TITLELINE = <text in the card title> // ⚠ Power Alert - Load Management System
$SUBTITLELINE = <text in the subtitle> // <h3>Load Management Now ACTIVE</h3>
$MESSAGETEXT = <text in the rest of the card> // Home Assistant Automatic NotificationNext is the actual $messagePayload ("card") we'll send with our Teams Graph request. For the most part this is cobbled together from whatever you build in the designer tool and loaded with the title/subtitle/text values we had submitted from HA:
  $messagePayload = '{
    "subject": null,
    "body": {
        "contentType": "html",
        "content": "<attachment id=\"$ATTACHMENT_GUID\"></attachment>"
    },
    "attachments": [
        {
            "id": "$ATTACHMENT_GUID",
            "contentType": "application/vnd.microsoft.card.thumbnail",
            "contentUrl": null,
            "content": "{\"title\": \"$TITLELINE\", \
            	\"subtitle\": \"$SUBTITLELINE\", \
            	\"text\": \"$MESSAGETEXT\"}",
            "name": null,
            "thumbnailUrl": null
        }
    ]
  }';
Finally, we use this information and payload to make the actual HTTP request via cURL:
  $curl = curl_init();
  curl_setopt_array($curl, array(
    CURLOPT_URL => "https://graph.microsoft.com/beta/teams/$TEAM_ID/channels/$CHANNEL_ID/messages",
    ...
    CURLOPT_CUSTOMREQUEST => 'POST',
    CURLOPT_POSTFIELDS => $messagePayload,
    CURLOPT_HTTPHEADER => array(
      'Content-Type: application/json',
      "Authorization: Bearer $TOKENDATA"
    ),
  ));

  $response = curl_exec($curl);
  curl_close($curl);
That's the basics of the bare-bones script, which we have dropped as index.php in the www/notify/ directory. Requests with the proper payload made to https://fqdn.lab/notify/ will process and run this script, and should send a notification to the proper Teams channel!
To Home Assistant!
Over in our HA instance, we can now set up the REST connections so that we can trigger and run automations!
Configuring the REST command
Home Assistant has a useful in-built integration called rest_command, and with it we can create a command in our configuration.yaml or other include file. It's relatively straightforward, especially if you have previously used templating in HA. For this example, we have three coordinating "Helper" entities configured, input_text.teams_notify_title, input_text.teams_notify_subtitle, and input_text.teams_notify_text. These helpers can be modified in a number of ways in HA, including directly through the user interface. We will assume they have respective values of ⚠ Power Alert - Load Management System, <h3>Load Management Now ACTIVE</h3>, and Home Assistant Automatic Notification.
With those bits set up, our rest_command configuration looks like this:
rest_command:
  teams_power_notification:
    url: https://fqdn.lab/notify/?title={{ states('input_text.teams_notify_title') }} \
    	&subtitle={{ states('input_text.teams_notify_subtitle') }} \
    	&text={{ states('input_text.teams_notify_text') }}
    method: GET
Restarting Home Assistant will expose this new command to your automations.
Creating an Automation
I created a bare-bones testing automation for this example, but there are any number of ways to configure automations in HA. My production HA instance already has the complex logic I created to determine when my house is actively under electric co-op load management. Since this logic is used for several things, I have a binary_sensor that is on/off for simplicity/reuse. This means I can create an automation (YAML below versus UI screenshot) to trigger the new rest_command:
alias: TEST TEAMS GRAPH API NOTIFICATION
triggers:
  - trigger: state
    entity_id:
      - binary_sensor.active_load_management
    to: on
actions:
  - action: rest_command.teams_power_notification
    data: {}
The Result? SUCCESS!!
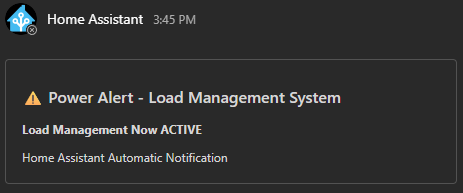
For a final test, I created a new user ("Home Assistant") in my tenant and added it to the Team with access to a channel in Teams. I then authenticated to my tenant as "Home Assistant" on the proxy so my REST calls will function as that user instead of me. In Home Assistant, by manually setting the binary_sensor.active_load_management sensor to on, the rest_command I'd created was triggered, as expected. The output to the Teams channel was quick!
So there it is—using direct Graph API REST calls to Teams for a notification. This isn't trivial as there are bits to configure, but if I'm honest I spent most of the time fiddling with the authentication flow (and card layouts). I still struggle with cards so I ended up using a version of the examples provided in Graph documentation versus something truly pretty...for now.
What I like about using rest_command versus regular rest in Home Assistant is that I am in control of the polling/activity. I haven't written about it (yet), but I have a working HA dashboard to interact with Entra ID and Intune via REST commands, and as I tell many folks in person/at events, it can get awfully noisy (frequent) when enabled. Using the command version gives me the same outcome, especially when coupled with this proxy, but without constant polling for updates.
My next side project with this is to port all of this logic to Python and (someday) build my own proper HA integration that would bypass the need for a proxy.
I hope you find something useful in this little ramble; it's fun to play around with coupling very different technologies to do something unique and on the edge. Good luck/Happy Inspiration!
Recent Posts
Past Speaking Engagements
I was a speaker at MMSMOA, May 3-7, 2026!
I was a speaker at MMS Music City Edition, October 12-15, 2025!

I was a speaker at TCSMUG Autopilot/OSD Day, July 15, 2025!
![]()
I was a speaker at MMSMOA, May 4-8, 2025!
I was a speaker at BrainStorm K20 Wisconsin Dells, March 9-11, 2025!

I was a speaker at MMS Flamingo Edition, October 20-23, 2024!

I was a speaker at TCSMUG OSD Day, July 31, 2024!
![]()
I was a speaker at NWSCUG, July 19, 2024!
![]()
I was a speaker at MMSMOA, May 5-9, 2024!
I was a speaker at BrainStorm K20 Wisconsin Dells, March 10-12, 2024!
I was a speaker at MMS Miami Beach, October 29-November 1, 2023
