Signing Git Commits: Chasing the "Verified" Stamp
- Matt Zaske
- March 01, 2021
- 6 minutes
I've been working on projects lately that actually involve writing more code than I have in a while...and so I'm using Git/GitHub with greater frequency than I have in some time.
A long time ago now I crossed an article talking about the process of signing one's commits. The TL;DR: signing commits simply validates that the user/email you claim to be in your commit aligns with your GPG key. Anyone who has committed anything with Git knows that it is easily possible to 'claim' to be anyone by virtue of setting the user.name and user.email variables, either locally to a clone or globally. This information becomes part of the commit history, and therefore you can 'claim' to be anyone.
Now, the risk for most personal/small projects is incredibly low, but it's the principle of the thing. And a good opportunity to play around with more keys!
But...Really, Why?
I'm gonna be honest -- my own nudge to get set up with signed commits was to make commit histories look consistent. When using the baked-in tools of GitHub to manage pull requests, those commits are automatically signed. So when I looked at the history, I saw a smattering of verified and unverified commits. And it bugged me. So I wanted to fix it.
GitHub provides documentation and guides for managing signatures which is super helpful.
The Desired Outcome: Behave Across Disparate Environments
If I was going to set this up and actually use/manage it for the longer term, one thing was clear: I needed this to work across very disparate environments with the least amount of fiddling/maintenance/configuration. I have both personal and enterprise GitHub access (using two different email addresses), two primary development machines (my home box and my work machine), both of which use WSL, plus a small handful of Linux server endpoints/environments where a rogue commit may be necessary. This meant one thing: I wanted to use one GPG key pair across all of these if possible.
Reader, I write to tell you it is possible...and it wasn't nearly as difficult to set up as I'd expected.
Step 1: GPG Everywhere, and Create a Key Pair
In all my environments except Windows, GPG is already available. So I needed to obtain the Windows client Gpg4win. In the end, however, I don't actually think I needed to do this, because I rarely use a graphical Windows tool to interact with Git anymore, since everything is based in WSL or Git Bash for me. But it's there and I can use it if/as necessary.
I ended up generating a GPG key pair in WSL on my primary home box, generally following the steps in GitHub's documentation for generating a new GPG key.
Step 2: Both Email Accounts
Since I am often back-and-forth in lots of repos across both personal/public and enterprise GitHub, and considering that I'm also lazy and not necessarily interested in overriding Git's global config for user.name and user.email for everything...it's just simpler to add both accounts to the same key pair. This way I don't have to remember to specify which key to use at which point, nor make sure all of this is set up consistently everywhere. There are some trade-offs with this approach (multiple addresses), but again the risk is pretty low for me over the convenience win.
The process by which I added the second address (though this scales for however many are necessary) is in GitHub's documentation. I did this again on my primary home box in WSL.
Step 3: Add to GitHub Environments
Once I had the key pair set the way I needed, I added the GPG key to both GitHub environments following GitHub's documentation. Super simple.
Step 4: Export/Copy the Keys to Other Environments
This part was probably the trickiest of the process. First, on my WSL instance, I had to export the keys (public and private) using the command structure:
$ gpg --output public.pgp --armor --export keyId
$ gpg --output private.pgp --armor --export-secret-key keyId
I could then ship/copy the public.pgp and private.pgp keys to the various endpoints/environments. It's super important if not obvious to protect the private key file in this process.
Step 5: Import the Keys
For each other environment, the process of importing the key pair is pretty simple:
$ gpg --import public.pgp
$ gpg --import --allow-secret-key-import private.pgp
Note that on Windows you'll likely need to do this in up to three places:
- WSL;
- Git Bash; and possibly
- Kleopatra (or other GPG key manager).
Step 6: Configure Git to Sign Commits
For each Git environment (each host), you'll have to also tell Git to use the proper key, which is documented by GitHub, but boils down to two commands:
$ git config --global user.signingkey keyId
$ git config --global commit.gpgsign true
Step 6a: Configuring VS Code to Sign Commits
In VS Code's settings, you'll want to search for 'gpg' and enable the settings for commit signing. Depending on how you configure your VS Code environment, this could be a string value in settings.json:
"git.enableCommitSigning": true
...or it could be a simple UI checkbox:

Step 7: Commit Something and Test!
At this point, try making a few commits in different environments and then run the following command in each to check the results:
$ git log --show-signature -1
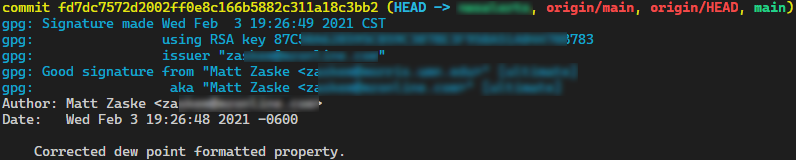
If somewhere in the commit/test/evaluate the signature phase something went sideways, the error message(s) you may receive are easily searchable and helpful enough to get the problem solved. This happened to me in one environment, and it turned out I'd forgotten to run one of the import commands which caused the commit to barf accordingly.
Step 8: Push and Celebrate!
Assuming you've tested things, you should git push that stuff to GitHub, at which point if you review the commit history you will see the Verified stamp!

Celebrate that accomplishment with pride, and then shame yourself for every commit not signed in the future!
I've glossed over what might seem like a lot of stuff, but those are the key bits to making this all work. I was able to stumble through this process myself in under an hour across what ends up being about six different, distinct environments. The good news is that since I got things set up and running, it's been working flawlessly in all environments.
So go forward and sign your commits, if for no other reason that you've caught that elusive "Verified" stamp!
Recent Posts
Past Speaking Engagements
I was a speaker at MMSMOA, May 3-7, 2026!

I was a speaker at MMS Music City Edition, October 12-15, 2025!

I was a speaker at TCSMUG Autopilot/OSD Day, July 15, 2025!
![]()
I was a speaker at MMSMOA, May 4-8, 2025!
I was a speaker at BrainStorm K20 Wisconsin Dells, March 9-11, 2025!

I was a speaker at MMS Flamingo Edition, October 20-23, 2024!

I was a speaker at TCSMUG OSD Day, July 31, 2024!
![]()
I was a speaker at NWSCUG, July 19, 2024!
![]()
I was a speaker at MMSMOA, May 5-9, 2024!
I was a speaker at BrainStorm K20 Wisconsin Dells, March 10-12, 2024!
I was a speaker at MMS Miami Beach, October 29-November 1, 2023
