Moving to Certbot with Let's Encrypt
- Matt Zaske
- October 05, 2020
- 6 minutes
This is the first post in a short series of posts about automating what one can in an environment that might not support full-automation with Certbot and Let's Encrypt. Technically it's the second post as the first was geared toward setting up key authentication between systems, something that's leveraged significantly in this series.
Quick Background
Several of my hosts live in an environment where I don't have full root access to the apache or webserver services. What this ultimately means is that I must install certificates manually via the cPanel interface, which is literally a copy & paste operation. However, this also means I can't run Certbot in fully-automatic mode since root-level access is required.
In early summer, 2020, the SSLForFree service I'd been using to do browser-based cert creation as a front-end for Let's Encrypt was merged into ZeroSSL's service. Both of these services are great for folks with a limited number of certificates. Unfortunately, my use case was only growing, and ZeroSSL has a limit to the number of free SSL certs issued without a paid plan, so it forced me to look into using Certbot to generate and manage my growing number of certificates.
Requirements to Get Started
I'm a huge advocate for the Windows Subsystem for Linux (WSL) and use it all the time in day to day operations. Having WSL available (along with Visual Studio Code) has really changed how I work, both for normal day job projects and other things on the side and for personal projects.
It's important to understand that this setup is running Certbot on a third-party host (not the webserver itself), which boils down to using the --manual command for every Certbot action. The User Guide for Certbot is quite detailed but is super overwhelming at first glance, especially if you're new to the certificate game.
My flavor of Linux for WSL is Ubuntu, and Certbot is available for easy installation on current versions, literally with a handful of commands (see Get Certbot for exact details):
sudo apt-get update
sudo apt-get install software-properties-common
sudo add-apt-repository universe
sudo add-apt-repository ppa:certbot/certbot
sudo apt-get update
Once these have been run, Certbot is available for use!
Obtaining Your First Certificate
If you have an identified host (this example will use superdomain.net), generating your first certificate manually is pretty trivial:
sudo certbot certonly --manual -d superdomain.net
Using this command, you'll step through a few prompts. First, and perhaps most 'daunting' is this notice about logging the requester's IP address. There is no workaround for this prompt, other than accepting. Entering No will cancel the process.
- - - - - - - - - - - - - - - - - - - - - - - - - - - - - - - - - - - - - - - -
NOTE: The IP of this machine will be publicly logged as having requested this
certificate. If you're running certbot in manual mode on a machine that is not
your server, please ensure you're okay with that.

Are you OK with your IP being logged?
- - - - - - - - - - - - - - - - - - - - - - - - - - - - - - - - - - - - - - - -
(Y)es/(N)o: Y
The next step in the manual process is to handle domain verification, which is handled with the trusty .well-known/acme-challenge file:
- - - - - - - - - - - - - - - - - - - - - - - - - - - - - - - - - - - - - - - -
Create a file containing just this data:

AkCnpli2xRSUw2vPgR0A8gLUCZtvhyEbIo1aq8_oWYA.QwR5fxV9v8X8jg2GoYFetupYACPp-L9kV8GdQYrS7MI

And make it available on your web server at this URL:

http://superdomain.net/.well-known/acme-challenge/AkCnpli2xRSUw2vPgR0A8gLUCZtvhyEbIo1aq8_oWYA

- - - - - - - - - - - - - - - - - - - - - - - - - - - - - - - - - - - - - - - -
Press Enter to Continue
This domain validation file is the same as one would receive via SSLForFree/ZeroSSL or similar services. Use whatever method is easiest for you to get this file/data on your webserver. My first attempts were handled manually with local text files and WinSCP. I'll go over ways to streamline this in the next post of the series.
Once you've done this, verification and cleanup take place:
Waiting for verification...
Cleaning up challenges

IMPORTANT NOTES:
 - Congratulations! Your certificate and chain have been saved at:
   /etc/letsencrypt/live/superdomain.net/fullchain.pem
   Your key file has been saved at:
   /etc/letsencrypt/live/superdomain.net/privkey.pem
   Your cert will expire on 2020-12-30. To obtain a new or tweaked
   version of this certificate in the future, simply run certbot
   again. To non-interactively renew *all* of your certificates, run
   "certbot renew"
 - If you like Certbot, please consider supporting our work by:

   Donating to ISRG / Let's Encrypt:   https://letsencrypt.org/donate
   Donating to EFF:                    https://eff.org/donate-le
Installing Your Freshly-Minted Certificate
In the cPanel interface, under SSL/TLS settings and the Manage SSL Hosts section, you will find the interface to "install" the certificate. In my experience, only two bits are required: the CRT file (contents can be obtained by sudo more /etc/letsencrypt/live/superdomain.net/cert.pem) and the private key file (contents can be obtained by sudo more /etc/letsencrypt/superdomain.net/privkey.pem)
Literally copy and paste these files' contents into the interface, and cPanel is smart enough to figure out if everything is good. As a follow-up step, once I have the CRT and KEY data pasted, I click the "Autofill by Certificate" button to complete the authority/intermediate bundle. Technically this is also available in the associated fullchain.pem file if you'd prefer to copy/paste it directly.
You'll end up with something like this screenshot:
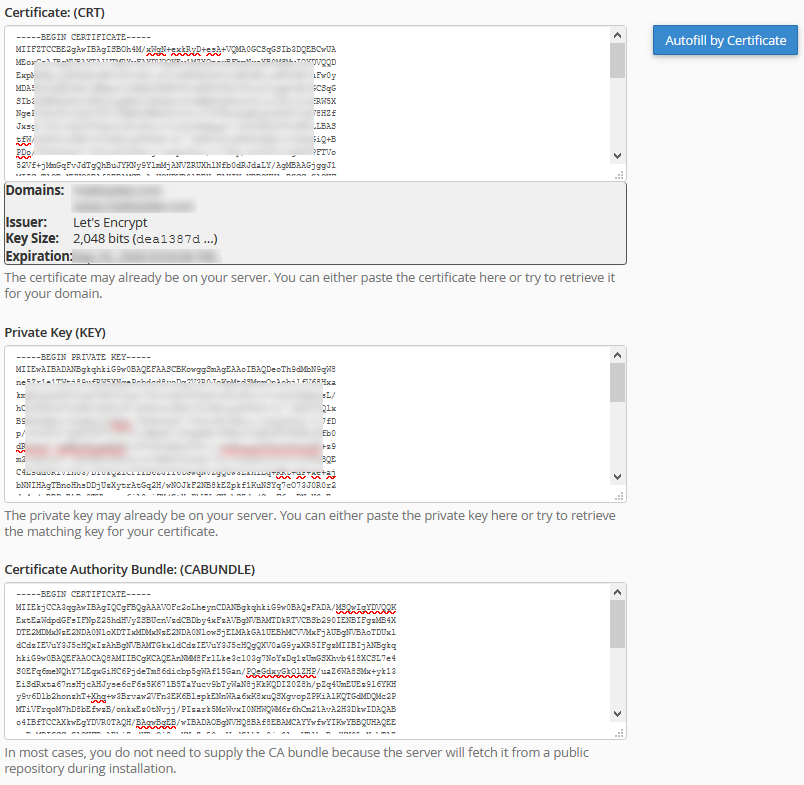
Click "Install Certificate" and you're good to go!
I have created a Gist with the key steps to get you Certbot installed and the example manual commands illustrated above.
What's Next?
In the next post, I'll go over steps to script out the aforementioned process for multiple domains, multiple names per certificate (e.g. with and without the www.), including a method to more easily handle the domain validation files as well as a simpler way to get the certificate and key output. In the final post, I'll walk through how I used manual hooks with Certbot to automate the domain validation process, which completely automates the entire process save for the copy/paste into cPanel.
My experience with this process has been most definitely incremental, and that's how I'm framing these posts. I first got Certbot working, then later streamlined the validation files, and finally bolted in remote validation via script hooks. There's no way I could've wrapped my head around doing it all out of the gate, but I used each quarterly renewal as an opportunity to look at 'pain points' to help figure out where I could improve the process. So give it a shot if you have a chance!
Recent Posts
Past Speaking Engagements
I was a speaker at MMSMOA, May 3-7, 2026!
I was a speaker at MMS Music City Edition, October 12-15, 2025!

I was a speaker at TCSMUG Autopilot/OSD Day, July 15, 2025!
![]()
I was a speaker at MMSMOA, May 4-8, 2025!
I was a speaker at BrainStorm K20 Wisconsin Dells, March 9-11, 2025!

I was a speaker at MMS Flamingo Edition, October 20-23, 2024!

I was a speaker at TCSMUG OSD Day, July 31, 2024!
![]()
I was a speaker at NWSCUG, July 19, 2024!
![]()
I was a speaker at MMSMOA, May 5-9, 2024!
I was a speaker at BrainStorm K20 Wisconsin Dells, March 10-12, 2024!
I was a speaker at MMS Miami Beach, October 29-November 1, 2023
